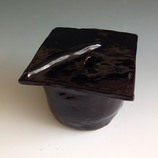
Graduation Cap
earthenware, underglaze, and glaze
5.5″x 5.5″x 6.5″
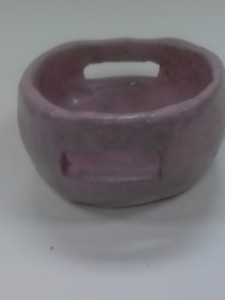
Purple Bowl
Earthenware, underglaze, and glaze 4″x 5″
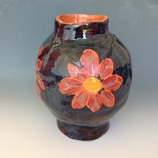
Vase
earthenware, underglaze, glaze
12″ x 8″ x 8″

Cedarville Mug
earthenware, underglaze, glaze
4″x 4.5″x 3″

Ohio Plates
Earthenware, majolica glaze, stains, and wax
2″ x 8″ x 10″
After learning to pinch and coil, I made a utilitarian bowl. This was the first time I took a risk because we just practiced making small pinch bowls. I decided to make my bowl larger and to cut handles into the side without knowing if the walls were going to collapse. The next project, I increased my art making skills by combining slab and coil building to create my graduation cap. It was harder to make because I had to get the lip even to get the slab leveled to make a good connection. The next project was my Cedarville University coffee mug which I decided to make with using block letters on the side to create a 3D effect. The block letters were somewhat of a problem because it was difficult to attach them to the mug and to add extra little pieces of clay to maintain the connection. This piece strengthened my personal style and ideas by adding texture to make the piece have an importance rather than just a glaze on top of it. After that, I developed a vase using coils and a template. The template improved my art making skills because I was able to create a somewhat even vase that was smooth. The template tested my ability to check and follow it to ensure a symmetrical vase. My two Ohio plates were my last project. This was the first project I used a mold to curve my plates, and during the project, I dropped my plates. I had to put them back together with slip, extra clay, and a serrated edge scraper. I was able to quickly solve my problem with using my resources and the knowledge I learned throughout the year. I would make my vase again because I would like to get it more symmetrical and smooth. My problem building it the first time was using uneven coils and not checking the template frequently. Next time, I will have to make even coils, use the template more, and press a little harder with the rubber rib to get crumbs and bumps out.
You did a good job on answering the questions and stating exactly what you would have done if you could remake your vase. You stated specifically what increased your skills and what needs more work.
It’s really cool to see how much you’ve improved over the year. It’s clear that you became much more confident in your pieces as you gained more experience. I can totally relate to reminding myself to check my template more while building symmetrical pieces. I had to create a Greek vessel, and I chose my shape and made the template. By the end of the project, it was a completely different shape, much wider and more stout. And even though you said that was something you needed to improve on, your finished vase is beautiful!
You answered each prompt very thoroughly and used examples of your own work, personalizing your response. I really like how each of your works are unique and express your personality. You have obviously grown as an artist and I admire how you’ve used numerous techniques to design and embellish your work.
I believe you did a very good job on answering the questions and giving good examples for each one. You described how you took risks and how you were prepared to fix anything that could have gone wrong.